


Structured analytics quick reference guide
This guide provides step-by-step instructions for creating and administering structured analytics. In particular, it discusses how to take advantage of running multiple structured analytics sets on the email threading and textual near duplicate operations. The main sections are as follows:
-
Creating a structured analytics set
-
Running and re-running a structured analytics set
-
Using the Copy to Legacy Fields button
This quick reference guide does not explain the operations themselves, but focuses on the administration of the structured analytics features.
For more detailed instructions, see the Analytics section of the documentation site.
Creating a Structured Analytics Set
Create your structured analytics set as follows:
-
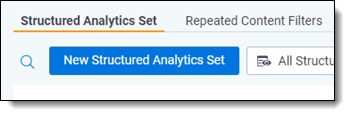
From the Indexing & Analytics tab, select the Structured Analytics Set subtab, and then click New Structured Analytics Set.
-
Give your set a name, and then specify a set prefix.
The set prefix is a required field regardless of which operations you select, but is only used for email threading and textual near duplicate identification. If you are using threading or near dupes and will use the resultant fields in saved searches, views, etc., we recommend using a short prefix such as “S1”. This allows you to fit more fields across the top of the screen. If you are not using the fields frequently in saved searches or views, a more descriptive prefix such as “TestUsingEmailHeaders” might be more convenient. -
Select one or more operations that you want to run. Take note of the following considerations:
-
We always recommend that you run repeated content identification on a random sample of your data for sets larger than 100,000 documents. For this reason, it’s not common to run it together with other operations. For more information, see Sampling for repeated content on the documentation site.
-
If email threading and textual near duplicate identification are run together, only the non-emails are analyzed for near duplicates. To run near duplicate identification on emails, run it in a set that does not include email threading.
-
-
Select a saved search as the data source that includes all documents to be analyzed.
Note: The fields returned by this search do not matter. Structured analytics always analyzes either the Extracted Text field, or an equivalent field chosen in the Select field to analyze setting. For email threading, it also analyzes other fields specified in the analytics profile.
-
Set the operation-specific settings. The details for each of these settings are beyond the scope of this guide, but explanations can be found in the Running structured analytics topic on the documentation site.
-
If using email threading or textual near duplicate identification, map the required fields to document-level relational fields.
There are two such fields for email threading, Email Thread Group and Email Duplicate ID, and one for near duplicates, Textual Near Duplicate Group. When using structured analytics in review, we recommend mapping to relational fields. However, it’s possible to map these fields to non-relational fixed-length text fields, and you might want to do this if you do not require relational capabilities. Common examples include troubleshooting a particular email thread or experimenting with a regular expression filter on a small set of data.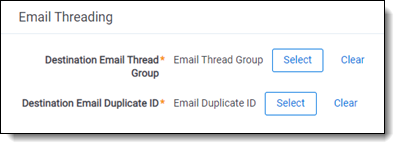
-
Set any optional settings you want:
-
Email notification list—list any email addresses that you want to receive structured analytics job status notification emails.
-
Regular expression filter—link a regular expression filter. This is not common, but can be particularly useful when you have extraneous text in emails, such as Bates numbers or page numbers. Such text can prevent email threading from successfully performing its analysis. Note that in structured analytics, only one filter can be applied; to strip out multiple patterns, you can join them with a vertical pipe character (“|”).
-
Analytics server—select the appropriate Analytics server.
-
Select field to analyze—for most cases, leave this set to Extracted Text. However, if you want to run structured analytics on a different field such as OCR’d or translated text, choose that field here.
-
Enable additional domain filtering—choose Yes to make it easier to sort through email address domains.
-
-
Click Save.
Running and Re-running a Structured Analytics Set
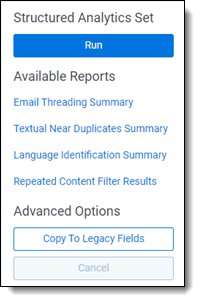
To run your structured analytics set for the first time, click Run on the structured analytics set console, then click Run again on the options box that appears. When you run an operation for the first time, it will always update results for all documents, regardless of what options you select.
If your document population has changed in some way, it’s often useful to re-run structured analytics, to either replace or supplement prior calculations. Follow these steps for the best results:
-
Adjust your saved search as necessary to include the complete set of documents that you would like to analyze. Typically, this includes previous documents plus new documents. It might also exclude some documents previously analyzed, which, under certain conditions, are then removed from the analysis.
-
Navigate to your structured analytics set and click Run.
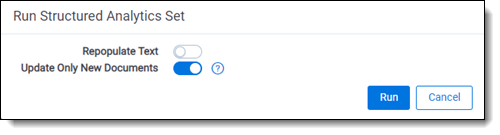
An options box appears that offers two toggles: Repopulate Text, and Update Only New Documents. Here are some considerations to help you choose correctly:
-
Repeated content identification and language identification: Setting Update Only New Documents to Yes doesn’t remove documents from the set if they’ve been dropped from the saved search. Other than this, there is no difference among the possible settings.
-
Textual near duplicate identification and email threading:
-
Repopulate Text to Yes and Update Only New Documents to No - this is akin to a “hard boot” of your results, and it is appropriate if you have changed the extracted text field on some documents, changed email metadata fields, or otherwise want to make sure you have the most complete reset of the algorithms. When you select these options, Relativity deletes and re-populates every document’s extracted text. It then removes any prior results and re-runs the algorithm on all documents.
-
Repopulate Text to No and Update Only New Documents to No - new documents are added (and documents no longer in the saved search are deleted), but documents that remain in the saved search from the previous run aren’t repopulated. The system then removes any prior results and re-runs the algorithm on all documents.
-
Repopulate Text to No and Update Only New Documents to Yes - only new documents are populated. For near duplicates, all prior textual near duplicate groups are preserved. New documents are added to prior groups or may form new groups, but prior principal documents and groupings aren’t changed. For email threading, all prior emails retain their inclusiveness, duplicate groupings, and thread groups.
-
Using the Copy to Legacy Fields button
After running email threading and/or textual near duplicate identification, results are written to the structured analytics results object and available to view via reflected document fields, such as “S1::Email Threading Display”. If you wish, you can have Relativity copy these results into the document fields which were used in prior versions of the product by clicking the Copy to Legacy Fields button.
While this is not necessary and not recommended for new users, it does have a few use cases for those who have used these features in the past:
-
Retains compatibility with scripts and applications built prior to the 9.5.196.102 release when the set prefix was introduced.
-
Allows previously built views, saved searches, and layouts to work as-is.
-
Supports workflows which require modifying email threading or textual near duplicate fields. Modifying the results fields themselves is not supported.
Note: This button only appears if the legacy document fields are present in your workspace. If they are not present but you still need this option, please contact Relativity Support.