


Active Learning quick reference guide
This guide provides step-by-step instructions for creating and administering an Active Learning project, with an Active Learning project checklist included at the end of the guide.
This guide is intended to focus on set-up and administration and does not explain the features in depth. It assumes that the Active Learning application is installed in the workspace.
The steps for setting up and administering Active Learning projects are as follows:
Create the project review field and choices
-
Create a single choice field.
-
Create two choices for the field, one to represent the positive choice, such as Responsive, and one to represent the negative choice, such as Non-Responsive. Any other choices created for this field will be considered neutral.
Note: Note: If the review team has coded documents prior to project creation, you can transfer the coding decisions to this field and use it to ‘jump-start’ the Active Learning project.
Set up the Reviewer Security Group
-
Determine which group in the workspace will contain the users that will be given access to the Active Learning review queues. Either create a dedicated group, or use an existing group.
-
Add the group to the workspace.
-
Make sure the reviewer group has at least View and Edit rights on the Document object. No other Active Learning permissions are required.
Set up a Layout
-
Create a coding layout that includes the project review field. Reviewers will use this layout to code documents in the Active Learning review queues.
-
Add other fields to the layout if desired. This could be issue coding or privilege coding fields, a field to indicate further review needed or technical issues, etc.
Create the Project Saved Search
Create a saved search to define the set of documents for the Active Learning project, using the following settings:
-
The search should return documents with an extracted text size greater than 0 and less than 30 MB.
-
The Extracted Text field should be the only field returned.
- Notes:
• When loading data using Relativity Processing, you can map Extracted Text Size in KB so that the size value is automatically populated.
• If the extracted text size field is not populated, run the Set Long Text Field Size mass operation.
Create the Classification Index
-
Enter an index name and select Classification as the type.
-
Set the data source to the saved search created above that returns the Active Learning project documents.
-
Save the index.
-
Click Run. If the page gives you a choice between Full and Incremental, choose Full for the first run.
-
To add or remove documents, update the data source saved search and run an incremental population.
- Notes:
• A classification index can only be used in one Active Learning project.
• The data source saved search defines the universe of documents included in the Active Learning project.
Create the Active Learning Project
-
Enter a project name.
-
Select the classification index created above.
-
Select the project review field, the positive choice, and the negative choice.
-
If you plan to follow a standard Active Learning prioritized review workflow, ensure that Suppress Duplicate Documents is set to No.
-
Set Reviewer Group to the group that includes the Active Learning reviewers.
-
Save the project.
Activate Prioritized Review Queue
-
On the Active Learning Project Home screen, click Add Reviewers on the Prioritized Review card.
-
Select the users that will have access to the prioritized review queue and click the green check mark to save.
If a user is later added to the group and needs to have access to the queue, repeat this step to add the user.
-
Click the Start Review button to activate the prioritized review queue.
-
Notify reviewers that the queue is active and available.
-
To access the queue, reviewers should navigate to the document view named after the Active Learning project and click the Start Review button.
-
To disable the prioritized review queue at any time, click the Pause Review button.
-
Monitor the Project and Update Ranks
-
Monitor project progress by viewing the Document Rank Distribution chart and the Relevance Rate in the Prioritized Review Progress chart on the Project Home screen.
-
To view, search, and sort on document rank score and document classification, run Update Ranks as follows:
-
Enter a Rank Cutoff score appropriate for your project to indicate the lowest rank score that will be classified as responsive.
-
Click Update Ranks. The system updates the following Document fields for each document in the project:
-
Categories - <Project Name> Cat. Set—documents below the cutoff are given the negative choice category (Non-Responsive). Documents at or above the cutoff get the positive choice (Responsive).
-
CSR- <Project Name> Cat. Set::Category Rank—the rank score on a scale from 0 to 100.
-
-
Perform Project Validation
To check the accuracy and completeness of your relevant document set, run Project Validation.
-
Click Add Reviewers on the Project Validation card on the Project Home screen. Select Yes to confirm.
-
Wait for the system to set up the test. This turns off all other queues in the project and suspends model updates.
-
Once the card says Start Project Validation, click the queue and complete the following:
-
<Positive Choice> Cutoff—the rank which divides positive and negative predictions. Editing this changes it throughout the Active Learning project.
-
Validation Type
-
Elusion Only—checks the elusion rate alone.
-
Elusion with Recall—checks elusion rate, richness, recall, and precision.
-
-
Sample Type
-
Statistical—creates a random sample set with the size based on a given Confidence and Margin of Error for elusion.
-
Fixed—creates a random sample of a fixed number of documents. This is a sample of the discard pile for Elusion Only and a sample of the entire project for Elusion with Recall.
-
-
Elusion Confidence Level—a higher confidence level requires a larger sample size.
-
Est. Elusion Margin of Error—a lower margin of error requires a larger sample size.
-
Reviewers—the users that will review documents during Project Validation.
-
-
Click the green check mark to accept the settings, then click Start Review.
-
Notify reviewers that they can code documents in the Elusion Test queue.
-
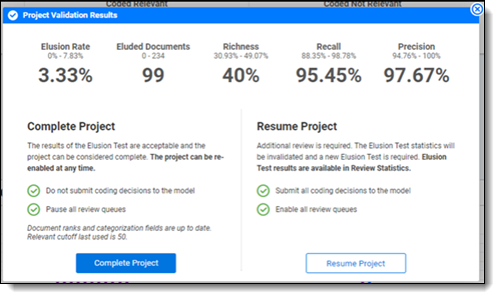
When reviewers have coded all documents in the sample, click View Project Validation Results. This will show you a summary of the validation statistics.
-
For full results, click on the Review Statistics tab in the upper left corner of the Project Home screen.
Active Learning Project Checklist
£ Create the project review field.
£ Create two choices for the review field.
£ Set up the reviewer security group.
£ Set up the review layout.
£ Create a saved search for project documents.
£ Create a classification index.
£ Create the Active Learning project.
£ Set up and activate the review queue.
£ After the project is underway, update ranks as needed.
£ After the project stabilizes, perform Project Validation.